04. March 2026 | How-Tow

Spring Laundry Drying Costs Compared: How to Save Up to €250 in Electricity by Using a Drying Rack Instead of a Dryer

Spring Laundry Drying Costs Compared: How to Save Up to €250 in Electricity by Using a Drying Rack Instead of a Dryer

Switching is easy: How much you save when the dryer takes a break

If you air-dry your laundry in spring instead of using the dryer, you can save about €80 to €250 in electricity costs per year, depending on household size. Even switching only halfway still nets you around €40 to €125.

How we calculated it: Assumptions in plain language

  • Electricity price: €0.35 per kWh (typical household rate)
  • Dryer electricity use per cycle: 1.8 kWh (modern heat-pump dryer, mixed load)
  • Calculation: 1.8 kWh × €0.35 ≈ €0.63 in electricity costs per dryer load
  • Spring effect: In spring, laundry dries faster on a balcony, patio, or by the window. That makes skipping the dryer easier.

The following values are typical rules of thumb. You can use them to roughly benchmark your own household.

Master table: Dryer vs. drying rack – your savings by household size

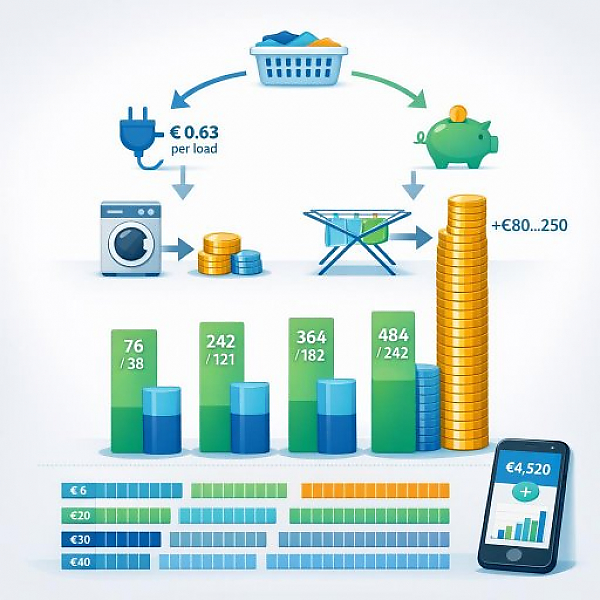
The table shows how much money you save if you replace the dryer completely or halfway with air-drying.

Household type Wash loads / month (estimate) Dryer cycles / month (today) Electricity use per dryer cycle (kWh) Annual dryer consumption (kWh) Annual dryer cost (euros) Savings with 100% air-drying (euros / year) Savings with 50% air-drying (euros / year)
Single 12 10 1,8 216 €76 €76 €38
Couple 20 16 1,8 346 €121 €121 €61
Family with 1 child 28 24 1,8 518 €181 €181 €91
Family with 2+ children 36 32 1,8 691 €242 €242 €121

How to read the table: A family with 2 or more children pays about €242 per year just for dryer electricity under typical use. If that family switches completely to air-drying, it can save that €242. If it only uses the dryer half as often, that still leaves about €121 in savings.

Step 1: Know your real dryer usage (mini household log)

Before you switch, it’s smart to know your current baseline. That way, you can see exactly how much you can really save.

Take 4 weeks and keep a very simple list. This works on paper, in a notebook, or on your phone.

  • Each time you do laundry, write down:
    • Date
    • How many loads?
    • Dryer used? Yes/No
  • At the end of the 4 weeks, add it up:
    • How many dryer cycles did you have total?
    • Calculate: number of dryer cycles × €0.63 = your monthly cost.
  • Multiply this monthly cost by 12. That’s a good estimate for your year.

Your benefit: You’ll see in black and white how much money is tied up in the dryer. That makes the switch much more motivating.

Step 2: Plan laundry days – how to use spring weather smartly

With good planning, you’ll barely miss the dryer. You’ll make the most of sun, wind, and dry air.

  • Establish 2–3 fixed laundry days per week, for example Tuesday, Thursday, and Saturday.
  • Check a weather app: Use dry or sunny days for bedding, towels, and large items.
  • Combine quick airing-out + drying:
    • Hang laundry up in the morning.
    • Open windows wide (5–10 minutes).
    • Then close the windows and let the laundry continue to air-dry.
  • Use balcony, yard, and window areas strategically:
    • Balcony: folding rack or wall-mounted bracket.
    • Window areas: place the rack near the window so more air reaches the laundry.

Your benefit: You’ll only need the dryer for emergencies, like when you need something dry very quickly.

Step 3: Create more space for laundry – without permanent clutter

Many households use the dryer for convenience. One reason: there isn’t enough room to hang things up. You can change that.

  • Use folding drying racks:
    • Racks you can fold up after drying and tuck behind a door or into a closet.
    • For small apartments: tall, narrow tower racks.
  • Install door and radiator bars:
    • Over-the-door rails for small items like socks, underwear, and kitchen towels.
    • Radiator or bathroom-heater bars for towels and small items.
  • Use ceiling lines or wall-mounted lines:
    • Retractable line over the bathtub.
    • Foldable wall line you can fold away when not in use.
  • Think through a system:
    • Where does underwear get hung?
    • Where do large items like bedding go?
    • Who in the family is responsible for taking things down and folding?

Your benefit: Your place won’t look permanently filled with laundry, and you’ll still save a dryer cycle every time.

Step 4: Ventilate properly – control humidity, prevent mold

If you dry laundry indoors, humidity goes up. That’s normal. The key is to ventilate correctly. That’s how you prevent mold.

  • Preferred rooms for drying:
    • Bathroom (with a window or good ventilation).
    • Kitchen (it’s often aired out anyway).
    • Hallway or a room with a window you can easily open.
  • Air out right after hanging:
    • Open the window fully right after you hang everything.
    • Ventilate strongly for 5–10 minutes.
    • Then close it again so the room doesn’t cool down too much.
  • Ventilate briefly a few times per day:
    • 2–3 times for 5–10 minutes is often enough.
    • Better than leaving windows tilted for hours.
  • Keep an eye on heating:
    • Slightly heated rooms dry laundry faster.
    • Turn the heat down briefly while airing out, then back to normal afterward.

Your benefit: You dry cheaply indoors while protecting your walls, furniture, and health at the same time.

Step 5: Turn savings into real money – with a simple budgeting trick

Many people save electricity but don’t actually notice the extra cash. A small budgeting trick changes that immediately.

  • Create a new category: Call it “Energy savings.”
  • Estimate your savings:
    • Look at the table above.
    • Example: Family with 1 child, switching halfway to air-drying.
    • The table says: about €91 saved per year.
    • Divide €91 by 12 ≈ €8 per month.
  • Transfer it each month:
    • Move that €8 intentionally from your checking account to a sub-account or savings goal, for example “Vacation” or “Emergency fund.”
    • If you don’t use a sub-account, at least record it clearly in your budget.
  • More switching = higher savings rate:
    • If you later switch fully to air-drying, adjust the amount.
    • Your benefit: You’ll see your savings cushion grow—through a simple everyday change.

Bonus: Practical tips to make air-drying work smoothly day to day

  • Hang it up right after washing: The less time laundry sits in the washer, the faster it dries and the fresher it smells.
  • Spin properly: Use a higher spin speed (for example 1200–1400 rpm) if your clothes can handle it. That way, laundry comes out much drier.
  • Shake laundry out: Give each piece a strong shake before hanging. This reduces wrinkles and shortens drying time.
  • Mix thick and thin items: Hang thick items (jeans, towels) on the outside and thinner ones toward the inside so air circulates better.
  • Don’t hang items too close together: Leave some space between pieces. A nearly empty rack dries faster than an overloaded one.
  • Emergency rule: Only use the dryer when you’re truly short on time—for example when kids’ clothes or work clothes have to be dry fast.

Conclusion: Springtime is dryer-saving time

In spring, it’s very easy to switch from the dryer to a drying rack. Depending on household size, you can save about €80 to €250 in electricity costs per year. Even if you only air-dry every other load, you’ll usually still keep €40 to €125 in savings.

If you also briefly log your dryer usage, plan laundry days, optimize space for drying racks, and ventilate intentionally, you can make the change immediately. Your benefit: lower electricity costs and more money for your goals—with almost the same comfort.

Download the Budget Tracker MyMicroBalance for Windows, Android or iOS