

To get detailed help please click on one of the following topics. You can also scroll though the list to find new features and learn more about the budget planning tool MyMicroBalance.
First Steps
Analysis
Main User Interface
The Universal Import Wizard imports transactions from CSV and text files into your MyMicroBalance balance file. This is particularly useful when you want to import transactions from online banking, a spreadsheet, another budget planner, or an older export.
The import in MyMicroBalance 6.1.0 is designed to handle many different file structures. First select the source file, then define how its values are separated, and finally map the detected columns to MyMicroBalance fields. The optional second separator can split information that a bank has combined within a single CSV column.
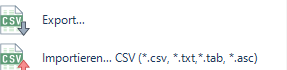
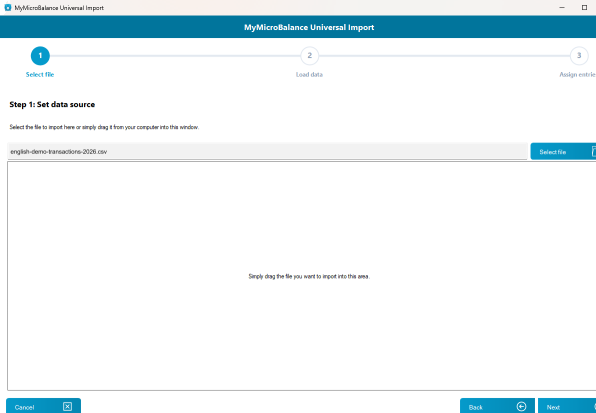
In the first step, select the file that you want to import. MyMicroBalance supports common CSV and text formats, including files with the extensions .csv, .txt, .tab, and .asc.
Many banks offer more than one export format. If possible, choose an export in which each transaction appears on its own line and the first line contains column names such as booking date, amount, transaction text, or payment reference.
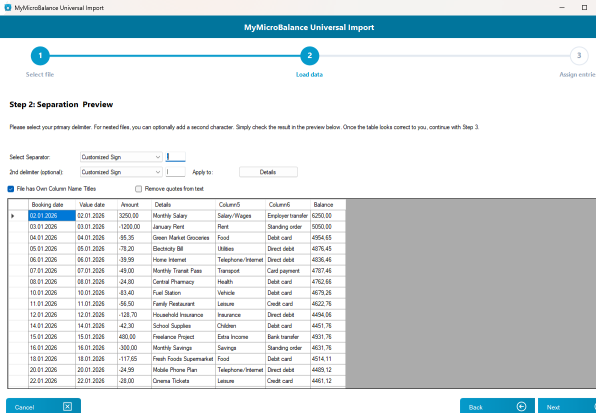
In the second step, MyMicroBalance detects the columns in the file. The separator determines where one value ends and the next begins. Bank exports commonly use a semicolon, comma, or tab. If your file uses another character, select Custom character and enter it.
Check the preview immediately. A line such as Booking date;Value date;Amount;Details;Balance should be divided into separate columns named Booking date, Value date, Amount, Details, and Balance.
If the first line contains column names, keep the column header option enabled. If the bank encloses text values in quotation marks, MyMicroBalance can remove those quotation marks when loading the file.
A particularly flexible feature of the import is the optional second separator. It lets you split one selected column again without changing the rest of the file.
This is useful when a bank combines several pieces of information in one column. For example, the Details column might contain January Rent|Rent|Standing order. Use the semicolon as the first separator, select the vertical bar | as the second separator, and apply it only to the Details column.
The single Details column is then divided into several columns. You can decide which of them to import as the name, category, comment, or reference. This two-stage model makes it possible to import many CSV files that would otherwise require manual editing first.
After loading the data, map the detected columns to the corresponding MyMicroBalance fields. The most important fields are Date, Name, and Amount. Depending on the source file, you can also map fields such as Category, Comment, Reference, or Interval.
Each target field can be mapped only once. If you map a column incorrectly, reset it to Please select... and then select the correct field. Leave columns unmapped if you do not want to import them.
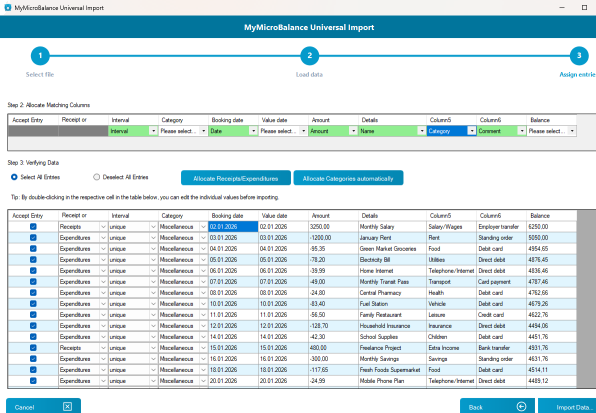
Review every row in the preview before importing. Only selected rows are imported. If a transaction already exists in your balance file, clear its checkbox to avoid creating a duplicate.
Use Allocate income/expenditures automatically to let MyMicroBalance determine whether a transaction is income or an expenditure from its amount and content. Use Allocate categories automatically to match transactions to existing categories. Always review the result, especially if the bank provides very short or unclear transaction descriptions.
If a value is incorrect, change it before importing. Pay particular attention to the date, amount, sign, category, and transaction text.
Important for automatic category allocation: In step 3, map a CSV column to the Name field. Select the source column that contains the transaction text, recipient, payer, or payment reference.
MyMicroBalance compares the content of the Name field with existing entries and their categories. If the Name field is not mapped or contains no meaningful value, Allocate categories automatically cannot produce reliable results. Review all suggested categories before importing.
Create a backup of the MyMicroBalance balance file or save a copy under a new name before a large import. With an unfamiliar bank format, import a short period first and review the result. Import the remaining period only after confirming that dates, amounts, names, and categories are correct.
Current MyMicroBalance files with the extension .mmb are not imported through the CSV wizard. Open them with File > Open or restore a backup if necessary.
If you need to import very old MyMicroBalance data or exports from an earlier version, create a backup first and test the process with a small number of transactions. Contact the MyMicroBalance Support Team if the old format is unclear.

 1
1 2
2 3
3 4
4